This week I tackled the bathroom.
Honestly, it was a bit easier than I expected.
But before I dive into that, let me give you an update on the previous week’s journeys.
Update on Kitchen And Bedroom
Kitchen is still looking pretty good. The pantry has stayed organized, clean, and easy to navigate. The fridge is getting a little disorganized, but nothing near what it was before. It’s been really easy to store everything where it should be and has felt really great!
Bedroom is staying in tip-top shape. Without having anything to throw on random chairs, jewelry boxes or nightstands, it’s been very easy to maintain and feels so much better to have the space tidy.
- Check out Part 1 (The Kitchen) and Part 2 (The Bedroom)
The Bathroom
I tend to go through my bathroom stuff periodically with ease. So this was much faster and a bit easier than the pantry.
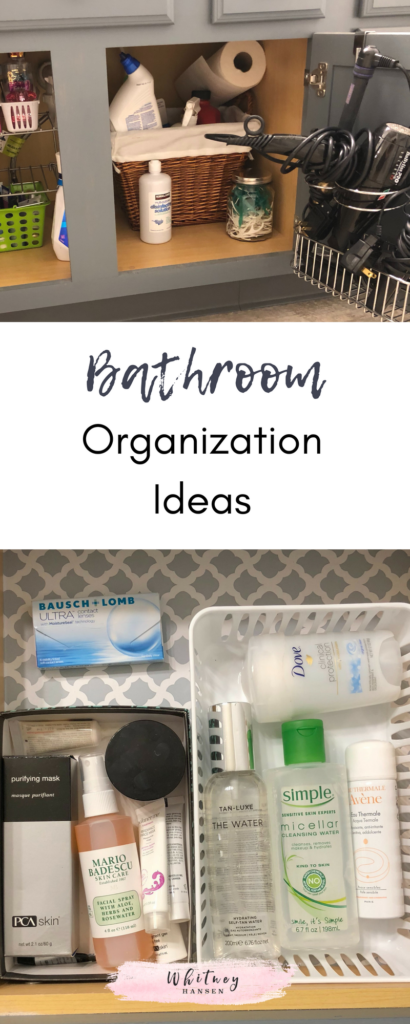
Step 1: Clean out all cabinets
I took everything out of the cabinets and placed it all over my bathroom (this mess stirred up a lot of anxiety in me!). Once I had everything out of the drawers and under the sink, I washed the drawers and got everything back in pristine condition.
Step 2: Go shopping for organization supplies
Since go through this journey, I am finding a new love for the Dollar Store. They legitimately have some really good stuff. I love their glass jars and containers and their storage bins are super reasonable for the quality.
I opted for a few glass storage jars and some storage bins for inside the drawers.
I also went to Fred Meyer another store and purchase a stacking shelf for under the sink and an over the door hanger for blow dryer, curling iron and straightener. I highly recommend a stacking shelf to optimize the vertical space for under the sink.
Altogether, I spent $10.60 at the Dollar Store and $26 at Fred Meyer.
Step 3: (OPTIONAL) Line Drawers with Contact Paper
Contact paper is making a comeback you guys! It seems a bit old school, but it’s super handy. I am finding it works well for keeping the drawers clean and in good condition, plus it adds a decorative flair.
If you’ve never applied contact paper before, don’t sweat it! I did it on my own and it was as easy as measuring the width and length and cutting the contact paper. Well worth it to give it a small pop of color!
Step 4: Organize your items by category
This can take a bit of time, but sort through all your items and put all your makeup together, your facial products together, body lotions or washes, health care/medicine, teeth care, etc.
Step 5: Put everything in it’s place
Once you have things sorted into categories, it makes assigning them a place in the drawers that much easier. My top drawers are the “beach front property” for the bathroom space, so those have the products that I use most frequently- face care products and makeup.
I decided to place our “overflow” items (extra toothpaste, mouthwash, feminine hygiene products, lotions, etc) in the hall closet so that it’s not taking up valuable space in our small bathroom.
We also opted for storing our cleaning supplies under the sink and hanging a command strip hook on the inside of a cabinet door to hang a washcloth. This helps us have easy access and quickly wipe down the counter as needed.
That’s it guys. I think was a super easy journey.
Stay tuned- next week we are tackling the garage. (I’ve got a feeling this is going to be a couple week project.) 🙁